Kitchen Design Trends

HGTV.com recently highlighted the most exciting kitchen trends in remodel and renovation projects. So what are people looking for in a kitchen design? Below you find the abbreviated list of HGTV’s current kitchen trends.

Pull Out Kitchen Cabinets:   Pull out cabinets are being used for several waste bins, including organizing your glass, plastic and waste. The drawer slides allow the cabinet to open and close with ease.

Convenient Kitchen Cabinets: In addition to using soft-close drawers – cabinets are used to organize and improve the overall efficiency of a kitchen. Ceiling to floor cabinets and ingenious storage makes counters less cluttered and kitchens more organized.

Universal Design:  Features today allow homeowners to age in place by applying Universal Design principles. Base cabinet drawers, large loop cabinet hardware, drawer microwave and moveable counter-tops accommodate any chef – young or old.

Exotic Wood: Designers are seeing an upswing in darker woods like cherry, mahogany and bamboo replace the lighter maples and oaks for cabinetry finish. Paired with brushed nickel or antique bronze hardware – giving every kitchen that extra flair.

For a complete list of the trends in kitchen design visit HGTV 

Making Cabinets Furniture


It hasn’t been long since cabinets were only found in the bathroom and kitchen and used simply as a basic necessity to hide our goods and clutter!

Now cabinets have extended all over the house finding their way into dens, offices, laundry rooms, children’s rooms, play areas, hall areas and even replacing traditional dining furniture.  Cabinets have become part of the homes design and not just for function but in many cases cabinets are becoming the room’s focal point.

Drop zone areas in the laundry, hall and entry ways are a great example of marrying function and design. Often these cabinet, bench and shelving areas are designed with function in mind, but become beautiful designer showpieces.

As cabinets become part of the interior design throughout the home, the cabinet consumer has become more knowledgeable about their wants and needs. Cabinet vendors are seeing savvy consumers opt for the furniture grade cabinets which perform at a high level. They want self closing under mount drawer slides, soft close European hinges, and all the other small details that make a cabinet more appealing.

Homeowner really  are seeking more from their cabinets and these demands are being met with options such as slide out towel bars, pull down shelves and pull out waste cans. Hiding toys, refrigerators, recycling and laundry baskets – cabinets are no longer being used for bathroom and kitchen storage they are blending function and design all over the house!

How to Install Cabinet Hinges

Installation Instructions (New Construction)

Door Preparation:
1. Make sure you have purchased the correct OVERLAY for your application. OVERLAY is Face Frame Satin Nickel Cabinet Hinges Euro Concealedsimply the amount that the door overlaps the frame on each side. For example: If your cabinet opening is 24″ wide and your door is 25″ wide, the door will overlap the frame by 1/2″ on each side (when it is centered over the opening). Therefore, 1/2″ overlay hinges are required.
2. Place two marks on the back of your door that are EXACTLY 20 mm from the edge of the door. One mark should be about 3″ (76 mm) from the top and one should be about 3″ (76 mm) from the bottom. These marks will be the center of the 35 mm cup hole.
3. At the marks you made in step #2, use the 35 mm drill bit to drill holes that are 1/2″ (13 mm) deep. A drill press works best for this.
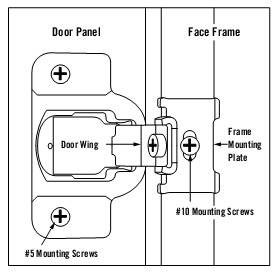
4. Place hinges in the cup holes (situated as in illustration #1). Making sure that the hinges are in the hole straight. Mark the center for each mounting screw on the back of the door. Remove hinges.
5. Use a 1/16″ drill bit to drill pilot holes at all the marks you made in step #4. Be very careful not to drill through the front of the door. Replace hinges and secure with screws.

Frame Preparation:
1. With hinges mounted in the door, hold the door so that it is centered on the cabinet opening (you may need help holding the door). Place the hinges’ mounting plates squarely on the frame edge and mark the center of the mounting screw.
2. Use a 1/8″ drill bit to drill pilot hole in the frame at the marks you made in step #1.
3. Again, place the door in position on the frame and secure with screw.
Note: it may now be necessary to adjust your hinges vertically and/or horizontally to assure that the door is perfectly centered.

Cabinet Hinge

Installation Instructions (Replacement)

1. Remove old hinges.
2. As in “Door Preparation Step #1”, make sure you have purchased hinges with the proper overlay. Place hinges in existing 35mm holes. Mark the center of all mounting screws.
3. It may be necessary to use wood putty to fill old mounting screw holes.  Also, the cabinet manufacturer may have used plastic fittings to attach the hinge to the door. These fittings may need to be removed and the holes filled as well.
4. Now follow “Door Preparation Step #5″ and frame preparation steps to finish the replacement process.

Note: When placing several cabinets together, it is necessary to leave a small amount of frame showing (reveal) between doors. This will ensure that the hinges work properly.  If using doors that are 5/8″ thick, then at least 1/4″ (R) of frame should be showing between doors. If using doors that are 3/4″ thick, then at least 1/2” (R) of frame should be revealed.